


I've always enjoyed creating things by hand, and it's something I still really love doing, especially now that I spend so much time behind the computer. That’s why I was excited when, based on the two 3D pieces from my portfolio ("Burning House" and "Living Item In Style"), I was asked to create more for the shop. This way, I could turn personal passion projects into actual work for my internship! And who knows.. maybe one of them will even be sold one day! Below, you’ll find a moodboard that reflects the kind of inspiration and atmosphere behind the design shop.
MOODBOARD

You can clearly see that the main theme is 'color', combined with neutral tones like black and white. This balance keeps the overall look from becoming too overwhelming and gives it a modern and professional feel. After endlessly scrolling through Pinterest, I was so inspired... I couldn’t wait to get started!
PROJECT 1

For this very first design, I started digitally, but I felt like it was missing something. When Monique suggested I try creating some non-digital pieces as well, I thought: “I actually really like this design.. it would be a shame not to use it!” So I decided to do both and turn it into a 3D piece. While searching Pinterest for different techniques, I came across something called tissue paper art. I had never heard of it before, but it looked fun and doable! Right after that, I started sketching the design onto canvas and mixing the materials.


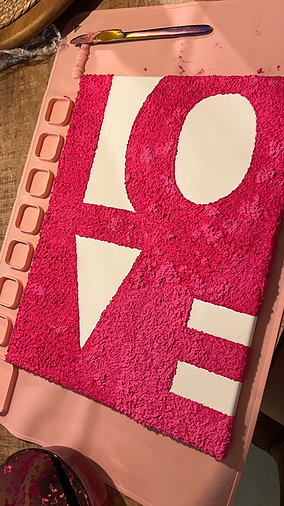
By mixing toilet paper, glue, and paint, I found the perfect texture and managed to get a lot done in just one evening! It’s a very easy technique to work with.. if you make a mistake, it’s super simple to fix. Using tweezers was also really helpful to add extra texture and detail. In total, I think I spent about a week on this project, mostly working on it in the evenings after my internship hours, since at that time I wasn’t sure if I could count it as part of my official internship. For future projects, I definitely kept this in mind! Once everything dried, the surface had an even color, though I did notice a few pink spots on the white areas. I later corrected those with a white paint marker.
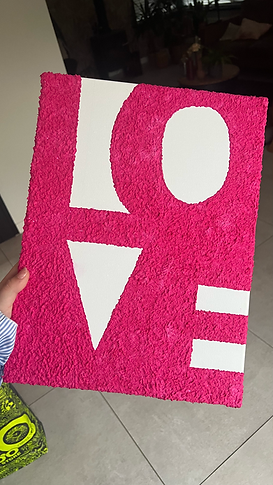

I’m super happy with the final result, and my colleagues at the internship also thought it turned out to be a great piece of art! But now on to the next projects, because I’m full of inspiration!
PROJECT 2
The previous project was quite simple, so I didn’t document much of the process. But this one... so much went wrong, and since I had never worked with this technique before, that didn’t help either. However, the end result turned out beautifully, so let me take you through the long process! I think I worked on this piece for about a month, since I had to wait at least a day or two between each step, and I didn’t have time to work on it every day. In the end, I even spent half-days at the office and continued working from home just to speed things up...otherwise it would’ve taken even longer!
STEP 1


I discovered this technique on Pinterest and dove right in without thinking too much about it.. which, in hindsight, might not have been the smartest move. I started by sketching out the lines where the clay needed to go and filled them in alternately, leaving a gap between each strip. Once those had dried, I filled in the remaining spaces. Since clay can be quite stiff, I mixed it with water to make it easier to shape and work with.


While it was drying, I suddenly noticed a crack in the clay… super annoying, but not the end of the world. I filled it in and once everything was dry, I started sanding the clay to smooth it out and improve the shape. But after sanding, I was so unhappy with the design that I decided to add an extra layer of clay over it… super smart, right? NOT! You'll soon see why that wasn't the best idea…


A huge, deep crack… And that wasn’t even the worst part. After I had filled it in, waited forever for it to dry, and finally started sanding again... a hole appeared because I had sanded too much... At that point, I didn’t care about the shape anymore, I just wanted it DONE. I was completely over it, haha. So I thought, “Let me just start painting, at least that can’t go wrong.” WRONG. It definitely can... but this time, for a personal reason:

I hated the color... Not when I started painting... back then it was still a soft pastel, just like I wanted. But somehow, it started to shift, and I wasn’t really loving it anymore. Still, I didn’t feel like repainting everything from scratch, and to be honest, I had already accepted that I probably wouldn’t even show this piece during my internship. So I decided to just experiment with the paint I had at home.
I found a few metallic paints, including one with a kind of pearlescent effect. After layering some of that on top, and adding a touch of gold here and there, I started to like it a bit more... Actually, I ended up thinking it wasn’t so bad at all!


I actually ended up really enjoying this project again! Maybe it was because I was finally almost done, or maybe because I genuinely started to like how it turned out. The effect of the pearlescent paint with the pink shining through was even better than I had hoped!
The only thing left to do was add a glossy topcoat and clean up the edges a bit. After that, it just needed to dry completely before I could bring it in and show it to my colleagues. I really hoped they’d think it looked great too and that I wasn’t just attached to it because I had spent so much time working on it!


When I showed the final result during my internship, everyone was super enthusiastic! They were even more excited than I was, which I honestly didn’t expect, but it made me really happy. They even told me I should sign the piece!
Both Linda and Monique, the owners of the company, really loved the artwork. They immediately said they would definitely place it in the store and that I should be really proud of it! Monique, who is also my internship supervisor, also told me I was doing a great job.
After all that amazing feedback, I’m definitely planning to turn this piece into a small collection. And next time, I’ll be using everything I learned throughout this project, hopefully making the process a bit quicker.
Below you can see the final result one more time!


These were the projects that i have finished so far, but i have started a few since then... take a look at some of them!

